28.8.12

Making Peg Dolls: The Photos

There are a number of the unsung heroes who have greatly contributed to my soon-to-be-released book Making Peg Dolls. At the top of the list is my husband, so today I am here to set the record straight.

Guess who is responsible for the utter gorgeousness of the photos for the book?  My very own Mr. Bloom!  Yes, I made all the dolls and arranged the little scenes to be photographed (in photo-lingo, that would mean I worked as the photo-stylist), but my Mr. Bloom... he set up a photo studio in our home, he set up the huge and very elaborate lighting system, and he spent endless time adjusting the lighting and made it all work.  It took us many hours and many days over a period of three months to shoot the photos for this book.  We bundled up in hats and warm socks, we drank many cups of coffee, nibbled cashews, listened for the baby to wake from his afternoon sleep, shot lots of photos and then edited all those photos.

How did Mr. Bloom get to be so clever about things such as setting up a photo studio with fancy lighting and everything?  Well, before he transitioned to his current career, he worked as a commercial photographer.  He shot advertisements for non-profits such as Catholic Charities and the American Heart Association.  He shot for magazines such as American Girl, he shot home-goods for Macy's catalogs, etc... etc...  Clever fellow!

 
We didn't take many photos to document the process of creating photos for the book, but in a moment of jubilation, I grabbed the above shot of one of our final photography sessions.

This was the result of that shot (and it's one of my favorites...)

Thank you, Mr. Bloom, for your photography magic (and for being a marvelous husband, too!)

19.8.12

Remy Charlip


  …I LOVE
YOUR HANDS,
YOUR TEETH,
YOUR NOSE,
YOUR ANKLES,
FEET,
AND ALL
TEN TOES.
I LOVE
YOUR WEST,
YOUR EAST,
YOUR CHEST.
IT’S HARD
TO SAY
WHAT I
LOVE BEST…

In the newspaper yesterday morning I came across an obituary for Remy Charlip.  With sadness and admiration, I read every word.  I was familiar with Remy Charlip only through Sleepytime Rhyme -- a book I love very much.  On the inside of the book jacket cover, there is a brief blurb which mentions the fact that Mr. Charlip had written a number of books and was also a choreographer.  At the time I read the book jacket blurb, this information seemed satisfactory to me, however, after reading his obituary, I have come to learn that this blurb barely scratches the surface of Mr. Charlip's delightfully creative career.  I learned that he was not just a choreographer -- he was a founding member of the Merce Cunningham Dance Company; the choreography he created which intrigues me most, however, is a series of pieces called "Air Mail Dances" which were based on a drawings sent through the mail to choreographers who then used the drawings to guide their dancers through movements onstage.

All told, Remy Charlip authored and illustrated 27 picture books for children, so you can well imagine that, as soon as I was finished reading the newspaper, I hopped online to see which of his books were owned by my local library system.  And, interestingly, Mr. Charlip has another intriguing connection to recent children's literature...

At the time he was writing and illustrating The Invention of Hugo Cabret, author Brian Selznick made the acquaintance of Mr. Charlip.  Brian Selznick realized that Mr. Charlip looked exactly as he had imagined his character of Georges Melies to appear and so asked his new friend to sit as a model for illustrations. The Invention of Hugo Cabret is a wonderful book and so this association made me smile...

Dear reader, if you come across a copy of Sleepytime Rhyme, I hope you love it as much as I do.  And to you, Mr. Charlip, I wish sweet dreams.

16.8.12

Making Peg Dolls: The Introduction

 
In early discussions with Hawthorn Press, it was mentioned that someone special would be asked to write an introduction to my book.  In this amazing world of reading and writing, there are so many wonderful authors; my mind spun with the possibilities and I was eager to find out who would write the introduction.  Imagine my delight when, in early July, I learned that Susan Perrow had agreed to introduce my book.

Over a year ago, I bought a copy of Susan's book Healing Stories for Challenging Behavior and liked it very much. Her book discusses how to guide children through difficult situations using stories, and at the time I purchased the book, I was working through some "challenging behaviors" with my older son. I appreciated the gentle approaches & interventions this book offered; not only is the book full of "ready-made" stories which can be brought out to address particular behaviors and situations -- the book also offers guidance in creating original stories for individual children according to their needs.  While the idea of making up such stories might seem daunting, Susan's tone is encouraging & supportive.  In the opening section of her book she wrote, "If this book... inspires you to create healing stories for children, don't get stuck on expecting perfection.  Your stories may have cracks, but -- to quote Leonard Cohen, 'that's how the light gets in'.  What is important is that you give it a go!  The light that gets in through the cracks may be your best teacher."

Ring the bells that still can ring; forget your perfect offering.
There is a crack, a crack in everything -- that's how the light gets in.
-- Leonard Cohen

This is all a very "work-a-day" explanation of why I appreciate Susan's work, however, what I love best about her writing is the way she brings into it the "mystery and magic of metaphor." Truly, when  Susan speaks of "the healing light of stories," she captures the soul of the work.  I love the following quote which she shares in her first book:

It is easy to forget how mysterious and mighty stories are.  They do their work in silence, invisibly.  They work with all the internal materials of the mind and self.  They become part of you while changing you.
-- Ben Okri
And now Susan Perrow has a new book, Therapeutic Storytelling: 101 Healing Stories for Children, which is just as wonderful as her first.  To find out about upcoming Therapeutic Storytelling Workshops, you can have a look here.

Thank you, Susan, for writing a most charming introduction to my book!

12.8.12

Baking Bread

A few weeks ago my little Mr. asked if I could teach him to bake bread.  Baking bread was something I taught myself to do in college; in more recent years baking bread has been a special activity little Mr. and I have enjoyed doing together (what's not to love about bread mice?)

Since the arrival of our wee Bloom I've baked, cookies & more cookies, loads of cupcakes and the odd cake or tart, however we haven't baked yeasted bread nearly often enough.


It so happens that the request made by little Mr. coincided with my discovery of a yeasted bread recipe I had been hankering to try from a book called Heaven on Earth by Sharifa Oppenheimer (and while I won't go off on a tangent at the moment, I will note that, given the chance, I could say endless nice things about this book!)  Making yeasted bread is not difficult but, with all the various stages of rising & kneading, it can be time consuming and requires a measure of advance planning; however, the recipe in Heaven on Earth is beyond simple. The bread is kneaded only once and not set to rise at all prior to baking. I wondered what kind of texture this would yield and was pleasantly surprised by the soft, rich interior of our loaves.

Before we set out on our latest bread-baking adventure, I thumbed through a few more books, just for fun.  There is my old standby from college, Mollie Katzen's The Enchanted Broccoli Forest, and my newest favorite, Baking Bread with Children by Warren Lee Cohen (this latter book not only contains recipes -- it's also full of bread-baking related songs, poems & stories to share with children.)  But in the end, the simple recipe from Heaven on Earth won out, so we gathered utensils, ingredients and set ourselves to baking.

 
I made a number of modifications to the recipe as written in the book -- they are reflected in the recipe below:

INGREDIENTS
4 Tbsp unsalted butter
1/2 cup honey
2 tsp salt
2 packets dry baker's yeast
3 cups whole wheat flour
4 cups unbleached white flour

Dissolve the butter and honey in 1 cup boiling water, and add in the 2 tsp of salt.

While the honey/butter/salt solution is cooling, in a separate bowl, dissolve the dry baker's yeast in 1 1/2 cups lukewarm water (I always test the temperature of the water on my wrist to assure that it feels warm but not hot.)

Pour the cooled honey/butter solution into the bowl with the yeast and then add the flour, one cup at a time, starting with the whole wheat flour.  As soon as the dough feels stiff and starts to form a ball, turn it out onto a floured board, knead for a few minutes and then shape as you (and your child-assistants) wish into rolls, animal shapes, braids or loaves. Note: if you plan to make loaves, I advise you to cut the dough in half to make 2 loaves (smaller loaves will ensure even cooking.)

Bake at 350 F for approx. 40 minutes (smaller shapes will require less time.)  Your bread is done when you tap it and it makes a sort of hollow sound.


6.8.12

Garden

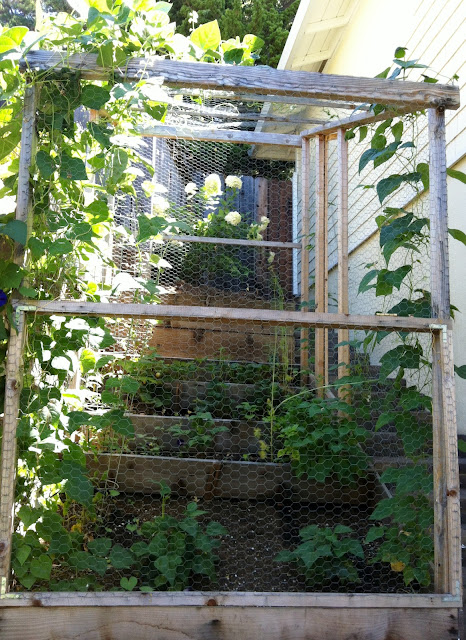
Two years ago, tucked into a narrow spot on the side our our house, we created this space for a vegetable garden.  Because of the local deer and rampaging racoons, we decided to enclose the space; however, we still lost all our bean-vines that first year because I planted the vines on the exterior of the enclosure instead of inside.  We have also learned, by trial and error, that this location does not get enough sun to grow zucchini, standard pumpkins or cucumbers.  We lost our zucchini, pumpkin & cucumber vines that first year to powdery mildew.  Last year we planted butternut squash and musque de provence, which are naturally resistant to powdery mildew, but had nary a squash to harvest.

 
This year, based on the successes and missteps from the previous two years, we have narrowed our focus and are only growing three "crops..." (though I had intended to put in some leeks, and never quite got around to it.)

Strawberries...

Tomatoes...

And Blue Lake pole beans... 

Can you see in the top photo of this post how the bean vines have taken over our little garden enclosure?  They're amazing!!  (We've also planted morning glories and a new hydrangea bush, just for fun...)


And every morning, when I check on our little plot tucked into 
the narrow spot on the side of our house, I hum this little chant --

Grass grass grass,
tree tree tree,
leafy leaf leaf,
one two three.

Birdy birdy bird,
fly fly fly,
nest nest nest,
high high high.

Cloudy cloudy cloud,
wind wind wind,
rain rain rain,
mud mud mud.

Doggie doggie dog,
runny run run,
quickie quick quick,
homey home home

Beddy bed bed,
sheety sheet sheet,
sleepy sleep sleep,
dreamy dream dream.

Dancie dance dance,
singy sing sing,
grow grow grow,
biggy big big.
-- Woody Guthrie

1.8.12

Ladybug


Ladybug, ladybug, 
Landed on my thumb,
Crawled onto my wrist 
And crawled up to my elbow.
Ladybug, ladybug,
Crawled up my arm,
And then she flew away...
 When my older son was a toddler we regularly attended a library story-time, the highlight of which was the moment the librarian brought out a large bucket full of tiny ladybug finger-puppets.  The roomful of toddlers made a mad-dash for those ladybug finger-puppets and then everyone would sing the little song I inscribed above.  Remembering this, I stitched up a ladybug puppet for my current toddler-in-residence to go with the little song...

by Shannon of Rhythm & Rhyme
I based the design of my first ladybug finger-puppet on this tutorial by Shannon of the blog Rhythm & Rhyme.  Her pattern yields a plump, round ladybug, perfect for little toddler hands.  Note: To make this into a finger-puppet, I added a second layer of felt to the base and left the end of the second layer unsewn to create space for a finger.
Of course, this first ladybug finger-puppet never stayed on my finger for very long, what with my wee Bloom craving to hold the ladybug puppet himself, so I quickly whipped up another finger-puppet.  This second puppet is flat -- not quite so round, plump and squeezable, but just as tickly as she makes her way from thumb, to wrist, to elbow to shoulder!


In case you'd like to make a ladybug of your own and sing along, here is a video of the song...

Note: This post has been linked to Creative Friday at Natural Suburbia and Friday's Nature Table at Magic Onions.