Showing posts with label celebrations. Show all posts

9.6.21

tutorial :: summer fairy peg dolls


In honor of International Fairy Day on June 24th, Bella Luna Toys asked whether I'd like to collaborate on a Summer Fairy Peg Doll Tutorial...

You can find the tutorial here!


In case you're interested, Bella Luna Toys sells copies of my first book, and they also sell blank peg dolls!


 How will you be celebrating International Fairy Day this year?

6.3.18

birthday


"I mean, what is an un-birthday present?"
"A present given when it isn't your birthday, of course."
Alice considered a little.  "I like birthday presents best," she said at last.
You don't know what you're talking about!" cried Humpty Dumpty.  "How many days are there in a year?"
"Three hundred and sixty-five," said Alice.
"And how many birthdays have you?"
"One."
-- Lewis Carroll

My birthday was last week. I made an ice cream cake (above), received cards, phone calls, emails + messages from near and far, a hug from one son, a hastily scrawled card from the other, and the most horrible bouquet of flowers from my husband. I adore flowers, but apparently the aroma of Stargazer lilies makes me nauseated (and in an odd twist, my sons felt sentimental about the flowers and became upset when I suggested that the best way to deal with the offending smell would be to send the flowers on a quick trip to the compost; so the flowers hung around the house, making me ill for several days).


On the heels of what shall heretofore and forever be known as "the horrible birthday bouquet," a magical parcel arrived on my doorstep from my dear friend Christine in France.

The first thing this parcel-of-marvels revealed was a birthday card; you can see the P.S. which Christine wrote at the bottom of the card. After reading this, I went through each item in the parcel, mystified.

After the card, next out of the box was not one but two(!) chocolate bars.  And no door to open.  Then, a pretty little paper packet of acorn caps came out of the box -- each variety of oak tree, across the world over, bears different shape acorns + caps, and I love receiving them. But there was no door here either.  I dug deeper into the box: a fancifully embroidered bag containing two ceramic feves for inserting into a galette des rois(!), plus two paper crowns (for setting atop a galette des rois)!  But no door.  And then...


The final little paper packet revealed... a door! Christine and I laugh when sharing peculiar vocabulary, and so, describing the little house as "biscornu," she asked what the translation might be. The best words I could come up with were lopsided, tumbledown, ramshackle, or simply crooked, which brings to my mind the traditional nursery rhyme, "There was a crooked man and he walked a crooked mile, He found a crooked sixpence against a crooked style; He bought a crooked cat which caught crooked mouse, And they all lived together in a little crooked house." Can you imagine a little crooked cat (and mouse) peering out of that tiny window beneath the roof-peak?


And then I did finally open the door to find a tiny bird, chirping a happy birthday message...


Detail upon detail... when I turned the bookmark over, there was a tiny apple tree.  The little crooked man, the little crooked cat, the little crooked mouse and the birthday bird, must surely feast well on tiny apple tarts, baked in a little crooked oven, of course.

And can you tell that Christine is part fairy?  Her stitches are so small, surely only a fairy could have sewn them. And surely only a fairy could have imagined such a bookmark...


Thank you, Christine, for this beautiful gift -- a perfect companion for my literary wanderings... xo

3.3.18

hinamatsuri


 Let's light the lanterns on the tiered stand,
Let's arrange the peach blossom branches.
Five court musicians are playing flutes & drums.
Today is a joyful Dolls' Festival.
-- Traditional Song

Hinamatsuri is celebrated in Japan on March 3rd. For this festival, families bring out a special set of dolls dressed in traditional court costumes of the Heian period, and modern doll designs are popular, too.  


This tradition inspired me to design a set of Hinamatsuri dolls for my first book (Making Peg Dolls, Hawthorn Press 2012), but this morning, I felt like updating my design and making a new set (see photo at top of the post).

photo courtesy of folkeshi

And my recent entree into the world of Instagram has sparked a renewed interest for me in kokeshi. Via Instagram, I've become acquainted with Laetitia Hebert who runs the shop Folkeshi where she carries a beautiful collection of vintage and modern dolls -- I've become especially enamored with the modern designs of Hiraga Teruyuki and Tayama Izumi.

Below are two videos of kokeshi artists at work.  They're mesmerizing.


Happy Hinamatusuri!

8.2.18

tutorial :: felt heart sachet

There is only one happiness 
in this life, to love and be loved.
-- George Sand


Not just on Valentine's Day, but every day, shouldn't our actions always come from a place of compassion and our words express what is good + true within our hearts? Perhaps this is why I have been stitching, sewing, knitting and felting heart shaped projects. Without stop. Without end.


SUPPLIES
-- Wool felt
-- Paper, pencil and scissors
-- Pinking shears + a pin
-- Embroidery floss + a neeedle
-- Dried camomile, rose petals + lavender
    (if you don't have dried herbs on hand,
     you can cut open a chamomile teabag
     and use the little flowers inside!)

STEP 1 ::  Use a pencil to draw a heart on your piece of paper, and cut it out with standard scissors. Note - the heart I cut out is 3 in. (approx. 7 1/2 cm) high, but you should feel free to make your heart pattern as small or large as you please.

STEP 2 :: Use pin to secure paper pattern to a single layer of felt. With pinking shears, cut around the outside of the pattern (i.e. do not cut the paper), leaving a 1/8 inch (3 mm) pinked perimeter. Then repeat and cut a second heart from your felt. Note - if you do not have pinking shears, don't let that stop you from making these little hearts... you can use a regular scissors to create hearts with smooth edges.

STEP 3 ::Thread a needle with embroidery floss in a color which contrasts with the color of your felt.  I used red felt and white embroidery floss, but you should use whichever colors make your heart happy!


STEP 4 :: Use a running stitch to sew the two felt hearts together, leaving approx. 1 inch (25 mm) open for filling.

STEP 5 :: Fill with dried flowers (and if you don't have dried flowers on hand, you can cut open an herbal teabag -- chamomile or peppermint teabags would be perfect for filling these little sachets).

STEP 6 :: Sew up the opening, add a loop of embroidery floss at the top (optional), and you're done.

There is only one happiness in this life, to love and be loved. George Sand
Read more at: https://www.brainyquote.com/quotes/george_sand_383232?src=t_love

4.2.18

tutorial :: a sweet valentine necklace

How many slams in an old screen door? 
Depends how loud you shut it. 
How many slices in a bread?  
Depends how thin you cut it. 
How much good inside a day? 
Depends how good you live 'em. 
How much love inside a friend? 
Depends how much you give 'em.
― Shel Silverstein


I adore Valentine's Day. Some people fuss that it's a holiday invented by greeting card and chocolate companies to part us from our money, but as far as I'm concerned... a holiday celebrating love + friendship? Hooray! When my older son started kindergarten and he had to make 20+ Valentine cards (one for each of his classmates), I was secretly thrilled.  The world can never have too many doily-bedecked, kindergartner-scrawled cards.  Now that my second son is in 2nd grade, we still go full-force into Valentine production every February, and this year we made the sweetest Valentine necklaces. Simple and perfect.  Just a small felt heart strung on a piece of embroidery floss -- "a heart on a string," if you will.


SUPPLIES
-- Wool felt
-- Embroidery floss
-- Fabric scissors
-- Needle which will accommodate embroidery floss

STEP 1 :: Use fabric scissors to cut small hearts from felt.  Our felt hearts are approx. 1 in. (25 mm) long, and we used traditional Valentine colors, but you could cut your hearts larger or smaller and in any rainbow of colors you please!


 STEP 2 :: Cut 15 in. (38 cm) lengths of embroidery floss.


STEP 3 :: Thread needle, string a heart onto each piece of floss, and pull through so that the ends of the floss are even.  Tie a knot just above the heart and then knot the ends of the floss together to create a necklace.


STEP 4 :: Try on a necklace and admire yourself in the mirror because you have good taste and are well accessorized. Keep one necklace for yourself and give the rest away so that everyone you know will be well accessorized, too.
xo mb


15.12.17

holiday gift ideas 2017


I'm a little late posting a list of holiday gift ideas. Okay... very late. Hanukkah has already started and Christmas is only 10 days away, but if you're stuck in a fit of last-minute-desperation, maybe my ideas will be helpful (she announced optimistically).

As with last year's holiday gift list post, I have to do some disclaimer-ing; most of us will agree that the whole holiday gift-giving thing is overblown.  The omnipresent marketing and merchandising in our culture is dispiriting; additionally, many people (myself included) are focused on minimizing unnecessary possessions.  Still, it's fun to make or find the perfect gift for someone we love. And in my mind, giving or receiving books is never a bad thing; books are in a separate category i.e. you can never have too many of them, nor can they ever be considered clutter (the same goes for flowers, fun card games and craft projects).

So, here goes.


1) Instant DIY :: Are you looking for an instant DIY gift (and an especially perfect teacher gift)?  Grab some canning jars and some pebbles, then head to your local garden supply shop to buy narcissus, jonquil or hyacinth bulbs.  Put the pebbles in the jar, add a little bit of water, add a bulb to each jar and tie some festive cord or ribbon around the top. Done. (Just make sure to tell the recipient to put the jar on a windowsill and add some water when the level drops.)


2) Donations to Non-Profits :: As with last year, one of the most meaningful and important gifts you can give these days is a donation to a non-profit in the name of your favorite person.  My favorite non-profits are the ACLU, the Southern Poverty Law Center, Environmental Defense Fund, and the Violence Policy Center.

3) Tickets to a Performance or Membership to a Museum :: This year my older son wanted to continue our family tradition of seeing the San Francisco Ballet Nutcracker.  It's gorgeous (and if you cannot make it to San Francisco to see a performance, you can watch it on DVD). Maybe there's a concert, play or ballet performance you've been wanting to see?  A museum you've been wanting to visit? An ice-skating or hiking adventure? You get the idea...

4) For Teens and Grown-ups :: Paste Quarterly Magazine (in print!), Secret Marvels of the World (from Lonely Planet), A Knight of the Seven Kingdoms and The Hedge Knight (graphic novel), The Hound of Rowan: book one of the Tapestry Series (this is a recommendation courtesy of my older son -- he ADORES this series), The Encyclopedia of Early Earth (my favorite graphic novel ever), and Relish (another of my favorite graphic novels), Anything is Possible by Elizabeth Strout, Red Rising (What?! You haven't read it yet?), Caleb's Crossing by Geraldine Brooks (I read it this past summer while visiting friends on Martha's Vineyard), and The 57 Bus by Dashka Slater.  Also, if you happen to know anyone who likes to crochet, the book Lalylala's Beetles, Bugs and Butterflies is just a bit scrumptious.

Non-book items? Music by Carolina Chocolate Drops (they were awarded by the MacArthur Foundation this year!), Cards Against Humanity (Viewer Discretion is Advised), any coffee mug or teacup from Anthropologie (they're all gorgeous), and if you're looking for a nice gift for your favorite (but very particular) teenager -- my husband bought a really good set of headphones for our older son.  Also, I am rather jealous of anyone who might be receiving one of these kits from Purl -- especially this one and this one.

5) For Younger Children :: The toddler on my list is receiving a copy of Little Penguins by Cynthia Rylant/illustrated by Christian Robinson (for goodness sake, what's not to love?), and another delightful (if peculiar) toddler option is Kuma-Kuma Chan. We also adore Du Iz Tak.  


Non-book items? This Spirograph set, or this one, this Lego set, Kiwi Crate (my son is obsessed), Root & Star magazine, my son loves this craft-kit, these Pattern Play Blocks, the Crazy Faces card game, another card game called Set, Sleeping Queens, and anything by SmartGames.  Thanks to this book my son has become a master at origami, he is also a pro at cats-cradle, and he prefers this yo-yo for perfecting around-the-world (and every other yo-yo trick). 

6) When you are completely baffled and out of ideas :: Slippers.

For more ideas, I like Catherine Newman's suggestions on her blog Ben & Birdy, and Rachel Wolf's list on her blog Clean.


12.2.17

sweethearts


Who can take a rainbow,
Wrap it in a sigh,
Soak it in the sun 
and make a groovy lemon pie?
The Candy Man...

The Candy Man can
'Cause he mixes it with love
And makes the world taste good.
lyrics: Leslie Bricusse & Anthony Newley


10.2.17

tutorial :: valentine heart stamps


A little tutorial on making tiny Valentine cards from peg doll heart stamps (reposted from February 1st, 2016...) xo


SUPPLIES FOR MAKING A PEG DOLL STAMP

-- 1 sheet of craft-foam (this stuff)

-- Larger size peg dolls, at least
    2 3/8 in tall (6 cm) like these

-- water color paint

-- beeswax polish (tutorial HERE)

-- Scissors & glue


INSTRUCTIONS FOR MAKING A PEG DOLL STAMP

STEP 1 :: Cut a shape from craft foam.  The shape you cut should be smaller than the diameter of the peg doll base.

STEP 2 :: Glue your foam shape to the bottom of the peg doll and allow the glue to dry for at least an hour or two.

STEP 3 :: Have fun using your stamp!

Note: If you use water soluble glue, be careful washing your stamp.  I find it's best to clean these stamps by dampening a paper towel and gently wiping off ink residue.


SUPPLIES FOR MAKING A STAMPED CARD

-- 1 peg doll stamp (see instructions above)

--  Colorful ink pads & a black ink pen

-- Card stock paper

-- Scissors or a paper-cutter


INSTRUCTIONS FOR MAKING A STAMPED CARD

STEP 1 :: Cut your card stock paper to desired size. My card stock was
 2 in (5 cm) by 3 1/2 in (9 cm). After cutting paper to size, fold it in half.

STEP 2 ::  Use ink pad to apply ink and then stamp your card(s).

STEP 3 ::  Use a black pen to write little messages on your card(s).


Happy (almost) Valentine's Day!

2.12.16

holiday gift ideas


Over the past few years (and even more so over the past few weeks), I've been having conversations with friends about how December has become a month of gift buying; and with many people I know focused on minimizing unnecessary possessions, the thought of buying so many gifts feels especially ironic and burdensome.  But even so, I truly enjoy figuring out perfect (if simple) gifts for friends & family.

Handmade gifts are wonderful, but not always right for every recipient, and realistically, I'd need to start working on gifts in January in order to finish making presents for everyone on time (and maybe not even then...)  So, I make a few gifts every year (usually for my children's teachers), but my go-to gift for nearly everyone else is a book -- even used books are fair game, because it's not about how fancy the book is, but what's inside.  And it's gratifying to get a call or email from someone saying, "I just finished reading that book you gave me & it was wonderful."

So, here goes... my list of holiday gift ideas.  However, please note: if you suspect you might be receiving a gift from me, go away. Scram. Now.

1) Donations to Non-Profits :: When my husband asked what I wanted this year as a holiday gift, I told him to please make donations to the ACLU, the Southern Poverty Law Center, Environmental Defense Fund, and the Violence Policy Center. It's not that I'm feeling like a martyr or don't like gifts, but there's nothing I personally want or need for myself right now and these foundations are doing important work.  This is not to say that donations to non-profits are good gifts for everyone, but it might be something to discuss with your children -- and make a group decision regarding which non-profit (or non-profits) you would want to support as a family with a donation this year.

Not all non-profits are what they seem, so it's a good idea to do a little bit of research into what each organization really supports and what percentage of donations actually go toward doing the work they say they're doing (as opposed to spending your donations on telemarketers, sending endless junk-mail and lining the pockets of their CEO's & CFO's). I checked in with Mother Jones and also appreciated the information in THIS article plus THIS article.

2) Tickets to a Performance or Membership to a Museum ::
Okay... so maybe there IS something I want for myself: tickets to Cirque du Soleil (and because tickets for Cirque du Soleil are crazy-expensive, I think this will count double as my birthday present).  Cirque du Soleil might not be setting up their tent in your town any time soon, but maybe there's a concert, play or ballet performance you've been wanting to see?  A museum you've been wanting to visit? An ice-skating or hiking adventure? You get the idea...


3) Gift Ideas for Teachers ::
Last year I made these for my sons' teachers, and this year I potted grape hyacinth bulbs together with tête–à–tête jonquil bulbs (see photo above).  My other favorite plants to pot and give as gifts are cyclamen or amaryllis bulbs.


4) Books for Teens & Grown-Ups::
These books were my favorites this year (though not all were published this year) and they have made my list of "go-to gifts."  Home of the Brave by Katherine Applegate, My Name is Lucy Barton by Elizabeth Strout, The Muse by Jessie Burton, The Last Runaway by Tracy Chevalier, Ready Player One by Ernest Cline, and also A Bunch of Pretty Things I Did Not Buy by Sarah Lazarovic. (This last suggestion is sort of an ironic gift, but really, the author's premise is brilliant -- instead of buying things she wanted, the author painted pictures of them and chronicled her impulses to spend & acquire.  It's thoughtful, inspiring, not at all preach-y, and very funny.)

And for my fav Harry Potter fans, young and older, there is THIS and THIS.


5) Books for Younger Children ::  
Home by Carson Ellis (because it's gorgeous), Tea Party in the Woods by Akiko Miyakoshi (because there's an impromptu parade through the snow... and cake), The Complete Polly and the Wolf by Catherine Storr (because we could all use a good laugh, and this book is hilarious), and finally The Horribly Hungry Gingerbread Boy (because this delicious version is by Elisa Kleven... and hint-hint... there will be a give-away for a copy here next week).


6) Craft Books for Children (and for the adults who hang out with them) ::
Paper Suncatchers by Christine Gross-Loh -- This little book is sold as a boxed kit with some translucent paper to get you started, but you will quickly need more paper (which you can find HERE).  We are obsessed with making window stars right now so this book lives on the kitchen table; we also love Window Stars by Thomas Berger which is sadly out of print, but if you can find a used copy for a good price, grab it!!

My younger son really enjoys activity books published by Usborne -- especially the Book of Things to Find and Color and I am fascinated by this optical illusion book... 

Make Faces by Tupera Tupera -- My mom gave a copy of this book to my son a few months ago, and trust me -- it's super fun (in fact, I'm surprised Amazon hasn't sold out because I've personally bought so many copies as gifts).

Magical Miniature Gardens & Homes by Donni Webber (there's a give-away for a copy of the book HERE)


7) Other Cool Stuff ::
My teenage son eats so much ice cream that our scoop is perpetually sitting in the sink in a puddle-y mess so I decided he should have his own special ice cream scoop.  This one seems really great so I got one for him.

I bought a box of rocks for my younger son; not regular rocks -- geodes.  He's going to love smashing them open with a hammer.

My parents bought this scooter for my younger son as a splurge-y holiday gift and gave it to him early so we could all enjoy it together over Thanksgiving.  I'm not sure who likes riding it more, me or my 6 year old.

And finally, when another family member asked what to buy as gifts for my kids, I suggested subscriptions to Kiwi Crate.


8) Stuff that Smells Good ::
My newest obsession is this Grapefruit Cardamom Skin Balm by Etta + Billie. It. Smells. So. Good.

9) What Would Dumbledore Want?  
These Socks.

For more ideas, Rachel's list of 101 Toy-Free Gift Ideas on her blog Clean is worth checking. Plus Catherine Newman's list HERE.


24.3.16

purim


Today is the Jewish holiday of Purim so I baked hamentashen using a basic sugar cookie recipe (like this one) plus whatever jam I happened to have in the refrigerator (this week, Four Fruits Preserves from Bonne Maman).  However, Deb Perelman of the blog Smitten Kitchen posted this amazing recipe for apricot hazelnut brown butter hamentaschen, and next year I might have to try it.

Happy Purim!

14.3.16

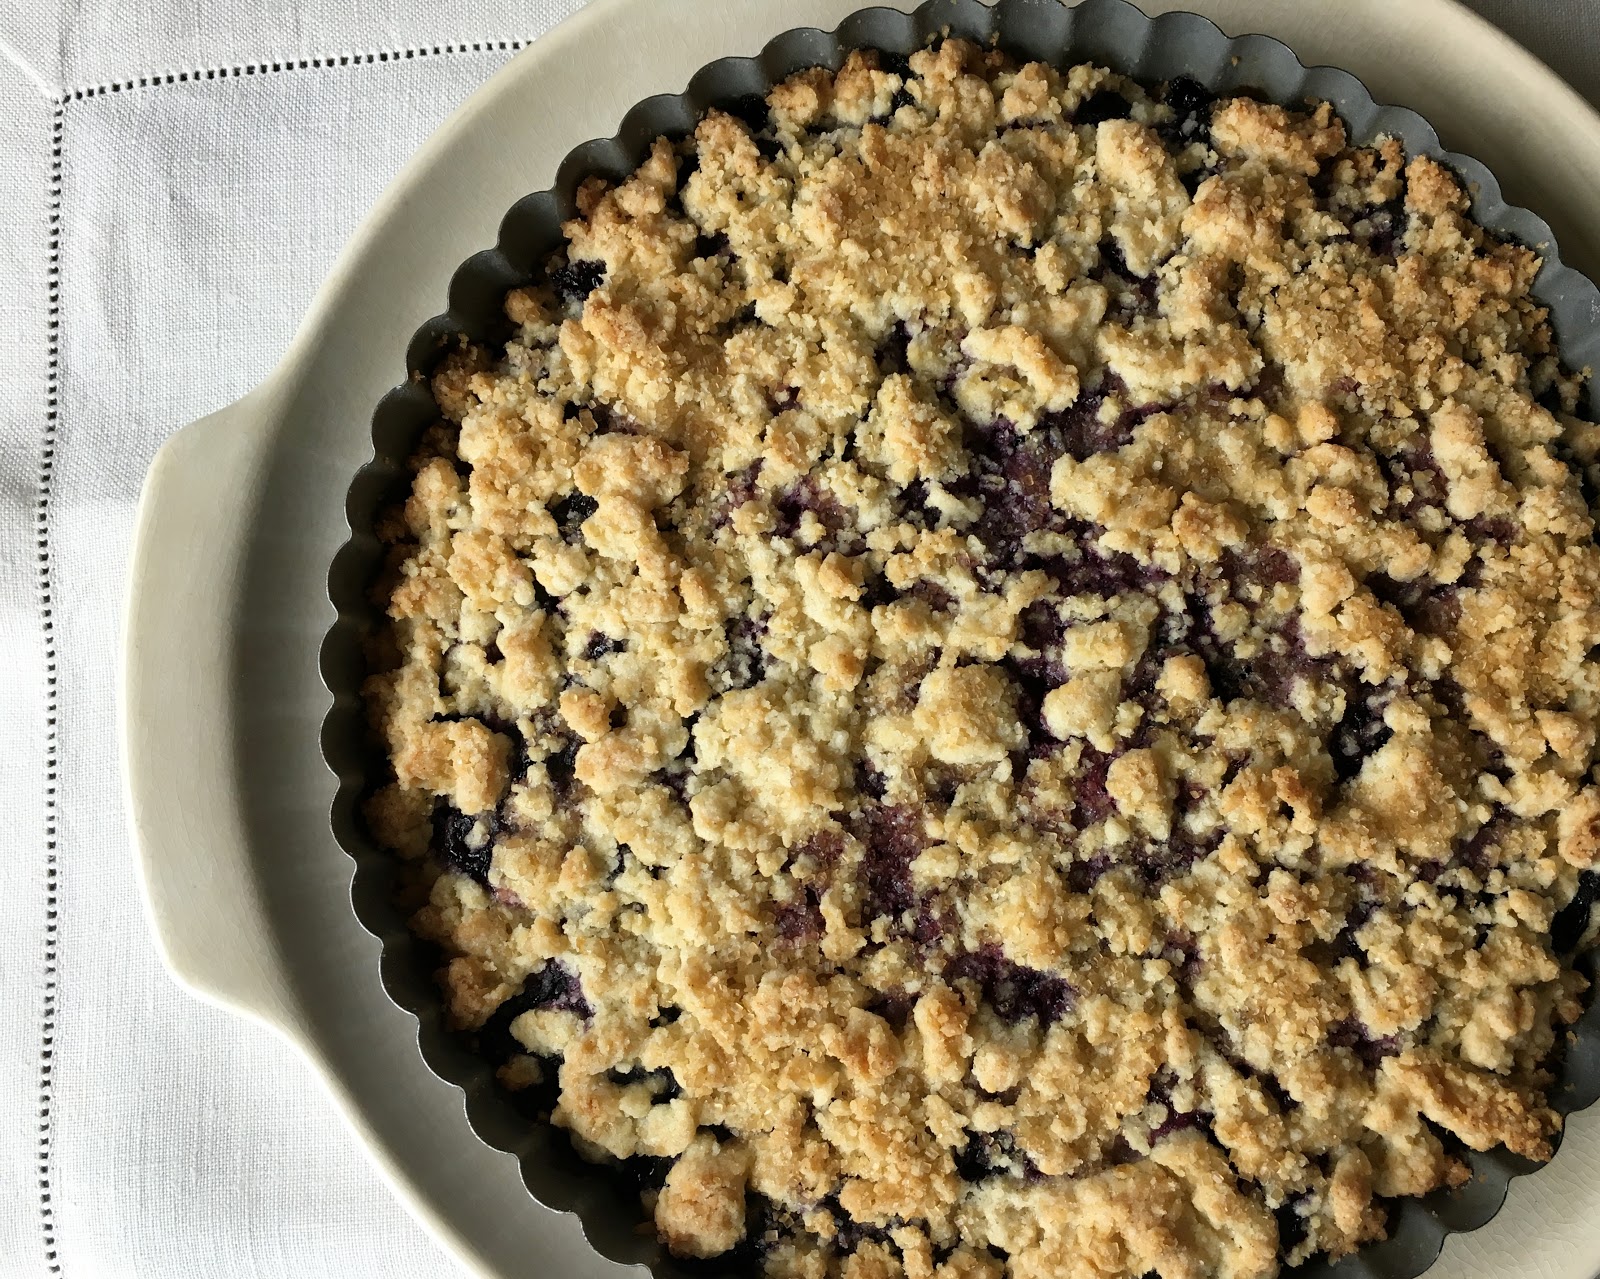
blueberry crumble pi


Happy Pi Day!  To celebrate, I'm planning to make pizza pi for supper and have just baked a blueberry crumble pi (fondly referred to as humble crumble pie) for dessert.

INGREDIENTS
1 1/2 cups unbleached all-purpose flour
3/4 cup raw/turbinado sugar
     (plus 1 TBL for sprinkling)
1/2 tsp baking powder
1/8 tsp salt
1/2 cup unsalted butter
1 tsp lemon zest
1 TBL lemon juice
1 egg
1 tsp vanilla extract
2 cups fresh or frozen blueberries
2 tsp corn starch

DIRECTIONS
Pre-heat oven to 375 F.  Butter and flour a shallow pie dish or tart pan (you can also cover the bottom of the pan with a circle of parchment paper and then butter the parchment if you wish).

Whisk together the flour, 1/2 cup turbinado sugar, baking powder and salt in a large mixing bowl.  Whisk the egg, lemon zest and vanilla in a small bowl, dice the butter into small cubes and then add the diced butter and egg mixture into the mixing bowl with the dry ingredients.  Use a fork (or your fingers) to cut the cubes of butter into the dry ingredients until your dough mixture resembles coarse crumbs with pea-sized bits of butter.

Scoop HALF the dough mixture into your prepared pan, and use your fingers to gently press it evenly into the bottom of the pan. Set aside.

Put the berries into a medium sized bowl, sprinkle the corn starch, lemon juice and remaining 1/4 cup turbinado sugar (you can use less sugar if you prefer) over the berries. Toss gently with a spoon and then arrange the berries in an even layer over the dough in the pan.  Squeeze the remaining dough mixture with your fingers to form some larger clumps, then distribute the clumps & crumbs in a layer over the berries.  Sprinkle a tablespoon of turbinado sugar over the top and place in the pre-heated oven for approx. 35 minutes, until the top is lightly browned and the berries are bubbling a bit around the edges.


Allow to cool for a few minutes before cutting wedges.  Serve with scoops of vanilla ice cream (and eat the leftovers for breakfast with tea).

1.2.16

tutorial :: valentine heart stamps


This is a redux of a tutorial from late last summer -- but this craft is so perfect for creating peg doll gifts and Valentine cards for your favorite sweethearts, that I thought it would be a good time to bring it back again.


SUPPLIES FOR MAKING A PEG DOLL STAMP

-- 1 sheet of craft-foam (this stuff)

-- Larger size peg dolls, at least
    2 3/8 in tall (6 cm) like these

-- water color paint

-- beeswax polish (tutorial HERE)

-- Scissors & glue


INSTRUCTIONS FOR MAKING A PEG DOLL STAMP

STEP 1 :: Cut a shape from craft foam.  The shape you cut should be smaller than the diameter of the peg doll base.

STEP 2 :: Glue your foam shape to the bottom of the peg doll and allow the glue to dry for at least an hour or two.

STEP 3 :: Have fun using your stamp!

Note: If you use water soluble glue, be careful washing your stamp.  I find it's best to clean these stamps by dampening a paper towel and gently wiping off ink residue.


SUPPLIES FOR MAKING A STAMPED CARD

-- 1 peg doll stamp (see instructions above)

--  Colorful ink pads & a black ink pen

-- Card stock paper

-- Scissors or a paper-cutter


INSTRUCTIONS FOR MAKING A STAMPED CARD

STEP 1 :: Cut your card stock paper to desired size. My card stock was 2 in (5 cm) by 3 1/2 in (9 cm). After cutting paper to size, fold it in half.

STEP 2 ::  Use ink pad to apply ink and then stamp your card(s).

STEP 3 ::  Use a black pen to write little messages on your card(s).


Happy February!