Showing posts with label tutorial. Show all posts

2.12.20

tutorial :: angel peg dolls


All night, all day,
Angels watching over me, my Lord.
All night, all day,
Angels watching over me.
(Gospel Hymn)

Today on the Moon Child Blog for Bella Luna Toys, you can find a new tutorial for peg doll angels. Click HERE to see it!  In July I also created a tutorial for Bella Luna's Moon Child Blog on the topic of painting peg dolls with multi-racial skin tones. You can find that tutorial HERE.

If you enjoy my tutorials, you can also find more peg doll designs and patterns in my two books. My first book is available for purchase from Bella Luna Toys, and both books can be found HERE, HERE, HERE and HERE.

15.11.20

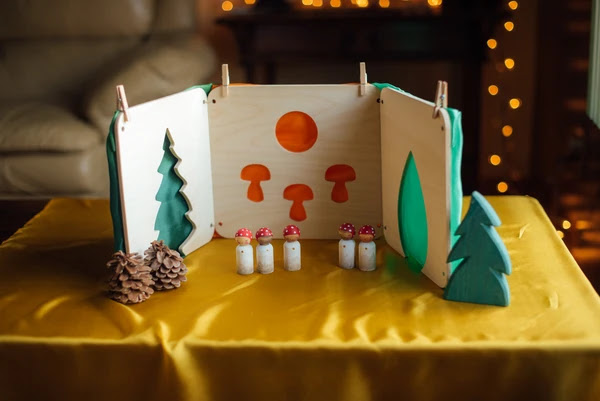
tutorial:: toadstool peg dolls


When Sarah, of Sarah's Silks, asked if I'd like to create a tutorial for peg dolls to accompany the launch of her new "Wooden Play Houses," I said, "Yes, of course!!"


You can find the toadstool peg doll tutorial HERE in the the Journal section of the Sarah's Silks website, and you can find the playhouses HERE.

If you enjoyed the tutorial, you can find more peg doll designs and patterns in my two books. My first book is available for purchase from Bella Luna Toys, and both books can also be found HERE, HERE, HERE and HERE.

16.7.20

tutorial :: crafting diversity


When children create artwork and playthings for themselves, not only will the work of their hands reflect imagination, but also reflect their own lives and the people who surround them. And because our children and the people who surround them are diverse, Bella Luna Toys and I have collaborated on this tutorial to reflect this beautiful, vital diversity. 

You can find the tutorial HERE on the Bella Luna Toys blog. I hope you receive this tutorial with as much love as I put into creating it.

5.2.18

tutorial :: peg doll valentine stamps


This little peg doll craft is a repeat from two years ago, but these sweeties are so perfect for creating peg doll gifts and Valentines, that I just can't help pulling them out of my hat again this year.


SUPPLIES FOR MAKING A PEG DOLL STAMP

-- 1 sheet of craft-foam (this stuff)

-- Larger size peg dolls, at least
    2 3/8 in tall (6 cm) like these

-- water color paint

-- beeswax polish (tutorial HERE)

-- Scissors + glue


INSTRUCTIONS FOR MAKING A PEG DOLL STAMP

STEP 1 ::Use watercolors to paint your peg doll, and allow to dry.

STEP 2 :: Cut a shape from craft foam.  The shape you cut should be smaller than the diameter of the peg doll base.

STEP 3 :: Glue your foam shape to the bottom of the peg doll and allow the glue to dry for at least an hour or two.

STEP 4 :: Have fun using your stamp!


Note: If you use water soluble glue, be careful washing your stamp.  I find it's best to clean these stamps by dampening a paper towel and gently wiping off ink residue.


14.12.17

tutorial :: acorn necklace


A few weeks ago at a school craft fair, I saw people walking past wearing the sweetest necklaces -- acorns with golden caps.  I was trailing after my little son during the fair and so wasn't able to visit the table where students were proudly selling their work, but I was determined to create a few of these baubles at home with my son.


SUPPLIES
-- Acorns and caps
-- Gold paint & a paint brush
-- An electric drill and vise
-- Small screw-eyes
-- PVS glue
-- Yarn or string


 STEP 1 :: Remove caps from acorns, apply gold paint and allow to dry.


STEP 2 :: Glue the painted caps back onto the acorns and allow to dry.


STEP 3 :: Secure your acorns in a vise (please, please, please be careful of your fingers and secure your project in a vise when drilling) and use a very small bit to drill a hole down through the cap and into the acorn.

Note: I use vise jaw liner pads similar to these to protect the items I am securing -- otherwise, a tight vise will damage fragile items.  I have been told that, if you don't own vise jaw liner pads, you can use a washcloth to protect your work when using a vise.


STEP 4 :: Screw the screw-eyes into the drilled holes, cut lengths of cord, ribbon or yarn, and knot to desired length.


Longer pieces of yarn or ribbon will be good for wearing as necklaces, but tied on shorter pieces of cord, these acorns would look pretty on a Christmas tree.  And if you are as fond as I am of shiny gilded objects from nature, you might enjoy clicking HERE to have a look at my tutorial for golden walnut garlands.


14.4.17

tutorial :: skipping rope


I'm always trying to think of new ways for my bouncy boy to spend time outdoors, and our new favorite activity is skipping rope.  I searched online to buy a jump rope for each of us, and wasn't excited by what I saw, so decided it would be fun to make our own.

I was able to find most of the supplies for these skipping ropes in our garage, and picked up a few other odds & ends (such as the claw clasp swivel clips) from a local hardware store.  Our skipping ropes turned out so lovely that I'm thinking of making a few extra as birthday gifts for friends.

SUPPLIES
-- an old broomstick or a 1 in. (2 cm) diameter dowel
-- braided cotton clothesline, 9-10 ft. (3 m) per jump rope
-- split metal key rings
-- swivel eye snap hooks (or claw clasp swivel clips)
    (you can buy sets of snap hooks + key rings HERE)
-- 1 1/8 in. (2.9 cm) eye screws
-- a pencil
-- small handsaw
-- hand drill
-- clamp to hold wood
-- sand paper
-- paint + paint brush
-- beeswax wood polish (optional)


STEP 1 :: Use a pencil to mark off 7 in. (18 cm) lengths on your old broom handle or dowel. Clamp your broomstick/dowel to a work bench or sawhorse and use a small handsaw to cut 7 in. (18 cm) pieces of wood.

STEP 2 :: Secure dowel pieces with a clamp, and drill small holes into one end of each piece (see photos below).


STEP 3 :: Use sand paper to smooth the ends of the dowel pieces, and if you've used an old broom stick, you can also apply the sandpaper to smooth the weathered exterior of the wood.


 STEP 4 :: Twist eye screws into the ends of your dowel pieces where you drilled the small holes.


STEP 5 :: Paint your dowels any pretty color your heart desires.  If you use watercolors to paint the dowels, you might want to rub them with beeswax polish once the paint is dry.  My recipe for beeswax polish can be found HERE.


 STEP 6 :: Add split metal key rings to the eye screws at the ends of your dowels.


NOTE :: We found that, if we just used the split metal key rings between the eye screws & ropes, the ropes would sometimes twirl up the handles as we jumped.   Adding swivel eye snap hooks (also called lobster/claw clasp swivel clips) prevented this problem. The skipping rope will work without the swivel clips, but if you have a problem with the rope getting wound up the handles, you might want to pick up a few swivel clips at the hardware store.  You can also order swivel clips (sold as a set along with split metal key rings) HERE.


STEP 7 :: Now it's time to add rope to your wooden handles!  I was surprised to discover that it's easier to skip with a rope which seems much too long.  Originally, I cut 8 1/2 feet of rope for my son. After allowing 6 in. at either end for knots, the length of the rope between his handles was approx. 7 1/2 feet long; however he kept complaining that it was too short.  I finally cut a new piece of rope for him which measured 9 feet (again, allowing 6 in. on either side for knotting).  I think my rope measured 10 or 10 1/2 ft. before knotting.  And never mind if you cut your rope too long and then need to shorten it; it's better to start with a longer rope and trim it down then to cut it too short to begin with.

If the ends of your rope begin to fray, you can wrap a small piece of cellophane sticky tape around the tips.


Here are a few traditional jump rope rhymes to get you started:

Down by the river,
Down by the sea.
Mama went fishing
With Papa & me.
How many fish did Mama get?
1, 2, 3, 4, 5, 6, 7...

Bubblegum, bubblegum, in a dish
How many pieces do you wish?
1, 2, 3, 4, 5, 6, 7...

What shall I name my little pup?
I'll have to think a good one up.
A, B, C, D, E, F, G...
(when the jumper misses, make up a 
name beginning with that letter.)

ABC's and vegetable goop.
What will I find in my alphabet soup?
 A, B, C, D, E, F, G...
(when the jumper misses, make up 
something silly beginning with that letter)

Mabel, Mabel set the table,
Just as fast as you are able.
Don't forget the salt, sugar, vinegar, mustard,
and RED HOT PEPPER!

Mama sent me to the store.
This is what she sent me for:
To get some coffee, tea & RED HOT PEPPER!
(note: after saying the word PEPPER, the jumper 
speeds up the rope and jumps as fast as possible!)

10.2.17

tutorial :: valentine heart stamps


A little tutorial on making tiny Valentine cards from peg doll heart stamps (reposted from February 1st, 2016...) xo


SUPPLIES FOR MAKING A PEG DOLL STAMP

-- 1 sheet of craft-foam (this stuff)

-- Larger size peg dolls, at least
    2 3/8 in tall (6 cm) like these

-- water color paint

-- beeswax polish (tutorial HERE)

-- Scissors & glue


INSTRUCTIONS FOR MAKING A PEG DOLL STAMP

STEP 1 :: Cut a shape from craft foam.  The shape you cut should be smaller than the diameter of the peg doll base.

STEP 2 :: Glue your foam shape to the bottom of the peg doll and allow the glue to dry for at least an hour or two.

STEP 3 :: Have fun using your stamp!

Note: If you use water soluble glue, be careful washing your stamp.  I find it's best to clean these stamps by dampening a paper towel and gently wiping off ink residue.


SUPPLIES FOR MAKING A STAMPED CARD

-- 1 peg doll stamp (see instructions above)

--  Colorful ink pads & a black ink pen

-- Card stock paper

-- Scissors or a paper-cutter


INSTRUCTIONS FOR MAKING A STAMPED CARD

STEP 1 :: Cut your card stock paper to desired size. My card stock was
 2 in (5 cm) by 3 1/2 in (9 cm). After cutting paper to size, fold it in half.

STEP 2 ::  Use ink pad to apply ink and then stamp your card(s).

STEP 3 ::  Use a black pen to write little messages on your card(s).


Happy (almost) Valentine's Day!

1.2.17

guest posting over at 'this picture book life'


Today you can find me collaborating on a post with Danielle Davis over at her blog This Picture Book Life.


On her blog, Danielle pairs picture books with crafts; and with the approach of Valentine's Day, we decided to feature The Uncorker of Ocean Bottles by Michelle Cuevas.  While The Uncorker of Ocean Bottles is not specifically a Valentine-themed book, per se, the message it brings is one of appreciation & acceptance (on any given day, Valentine's or not, everyone could use some of that).

And while you are visiting Danielle at This Picture Book Life, I highly recommend having a look around... the books & crafts she features are particularly delightful.  Also, do keep your eyes open this fall; Danielle's middle-grade novel titled Zinnia and the Bees is slated for release!

Click here, and I'll see you over at This Picture Book Life!

23.12.16

hanukkah collage craft


Yesterday morning, two other moms and I spent some time in my younger son's classroom sharing Hanukkah traditions, eating latkes & doing an art project. The idea for this project was shamelessly borrowed from the blog Dim Sum, Bagels, and Crawfish -- and the artwork created by these kindergartners & first graders was so gorgeous that I had to share it.


SUPPLIES
--  Large paper (12 in. x 18 in. was available in
     the classroom)

-- Colorful scrapbook or origami paper

-- Orange & yellow paper

-- A paper cutter (essential if prepping this craft for
    a classroom of 22 small children -- not essential
    if doing this craft at home).

-- Scissor

-- Glue stick

INSTRUCTIONS
STEP 1 :: Cut strips of paper as follows: 2 in. x 14 in. for each hannukiah base, 2 in. x 2 in. for the shammash candle holder, 1 in. x 5 in. for candles (you will need 9 candles for each child's project).

STEP 2 :: Cut 1 inch strips of yellow & orange paper.  Then use a scissors to snip the strips into diamond & triangle shapes for the candle flames.

STEP 3 :: Set out the large sheets of paper, strips of colorful paper, and glue stick then stand back and watch as gorgeous collages are created.

NOTE: I was facilitating this project in a classroom of 5-7 year olds and we allotted approx. 20 minutes for the craft.  If we had had more time for the project, giving the children scissors to cut out their own candles would have been an option.  And certainly, if doing this project with older children, there is no need at all to pre-cut the paper into strips and they can cut the paper into strips themselves.

21.12.16

tutorial :: acorn dreidels

Originally posted December 9th, 2015


I spotted this tutorial for acorn dreidels on the blog Growing up Creative.  Brilliant!  These are not traditional dreidels because they don't have Hebrew letters on them, but when it's Hanukkah, every sort of spinning top is referred to as a dreidel in my house.


SUPPLIES
-- Acorn caps (note: we tried out a few different
    types of acorn caps and liked the way these
    ones spun best, but any sort will work.)

-- A small amount of clay (we used Sculpy, but
    again, there's no need to be fussy -- any sort
    will work.)

-- Wooden matches


STEP 1 :: Roll a small amount of clay into an egg-shape and stuff one end of it inside an acorn cap.

STEP 2 :: Shape the top of the clay into an acorn-ish shape.


STEP 3 :: Insert the salt-peter end of your match into the center of the clay and push it down until it hits the inside of the acorn cap...


Like so.


Now your dreidel is done and ready to...


Spin!


And because you can never have too many peg dolls, I thought I'd mention that there are instructions for creating peg doll dreidels in my second book.  For more dreidel fun, you can find edible dreidels here (made them today with my children and they really work). We've also made super fun perler-bead tops according to the instructions HERE at Babble Dabble Do.


Happy (almost) Hanukkah