I love Halloween decorations -- my favorite ones are the sweet, wonky paper cut-outs of jack-o-lanterns, bats, spiders, owls, witches & cats made by children. When I see homemade decorations taped up in windows, I know families with young children must live in those houses.
We usually have bats in our windows, but this year I thought it would be fun to make some jack-o-lantern faces. Originally, I'd planned to just collage some faces onto orange paper circles, but when I started thinking about the fact that these were going in the windows, I couldn't resist bringing out our stack of translucent window-star waxed paper (available for purchase here and here). Note: if you don't have window-star paper and you're not interested in purchasing new supplies for this project, just use plain orange craft paper, and your jack-o-lantern faces will look just as sweet.
SUPPLIES
-- Orange paper
-- Black paper
-- [OPTIONAL] Orange window-star paper (you can buy it here or here)
-- Scissors, glue stick, a hole punch, string and sticky-tape
STEP 1 :: If you are using window-star paper, cut it into ovals approx. 16 cm wide by 15 cm high.
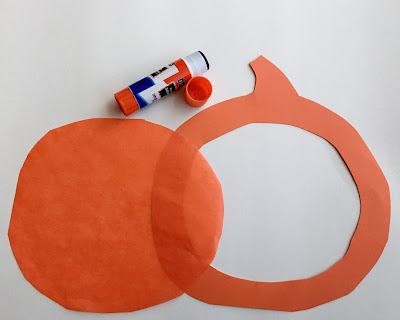
STEP 2 :: Draw and cut out craft-paper pumpkins approx. 18 cm wide, and then cut ovals in the centers of the pumpkins approx. 15 cm wide by 14 cm high. (note: if you are not using the window-star paper, don't worry about cutting out ovals in the centers of your pumpkins.)
STEP 3 :: Apply glue stick around the edges of the ovals in the pumpkin centers and secure the window-star paper in place.
STEP 4 :: Cut out small triangles, rectangles, circles and mouth shapes to suit your fancy.
STEP 7 :: Admire your child's attention to detail, especially in the application of expressive eyebrows.
STEP 8 :: If you plan to use string to hang your jack-o-lanterns, punch 2 holes at the top of each (otherwise you can just tape them up on the window).
STEP 9 :: Stand back to admire the silly faces, knowing that
everyone who passes by your house will smile when they see your
decorations.
P.S. If you're a new-ish visitor to my blog and you haven't yet seen my Halloween tutorial for peg doll bats, you can click HERE.


Those bats make me smile big every time I see them.
ReplyDeleteDitto smiles re ^^-^^ ^^-^^ ^^-^^. Just love the @ @ @ (OK ok they are not the most perfect pumpkins). Love to your bats in the attic from the little }8>: and my batty bats. xxxx
ReplyDeleteWonderful creativity as always!
ReplyDelete